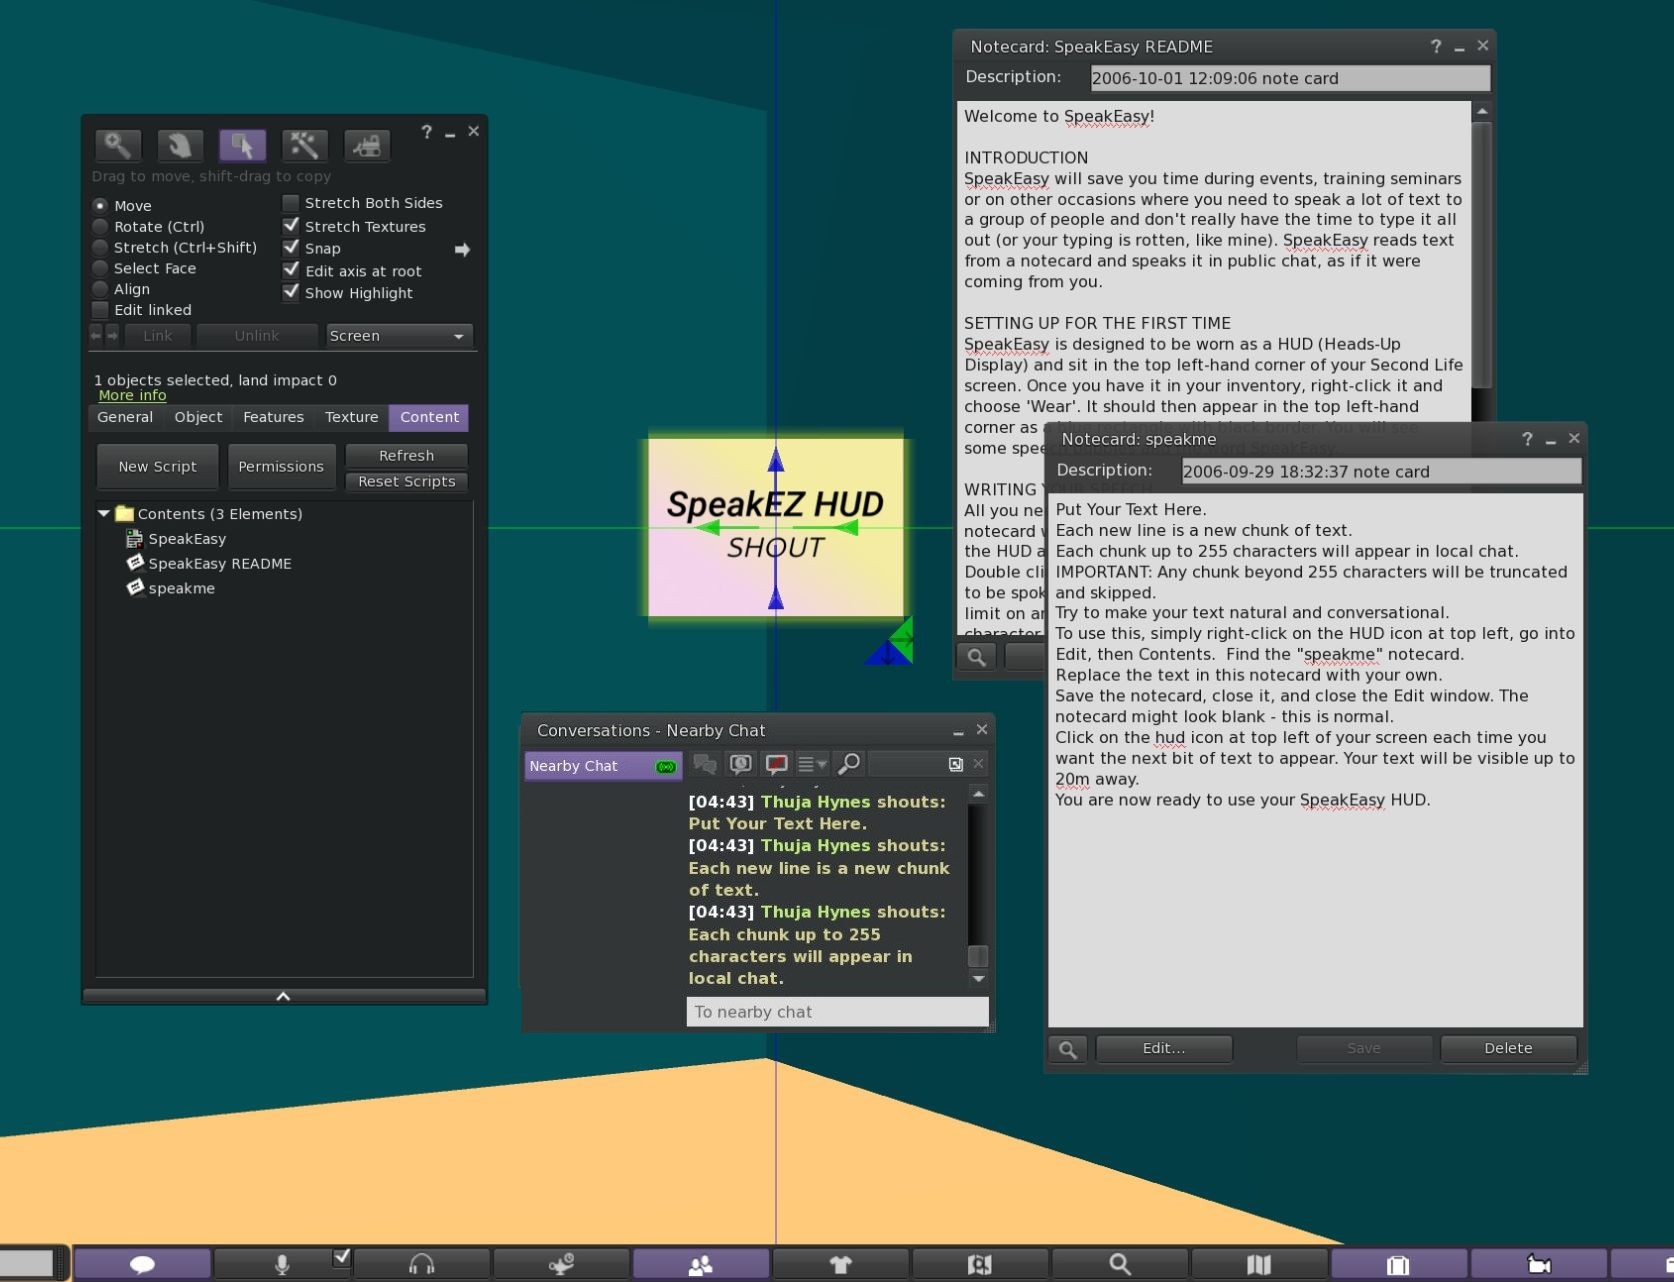
The Speakeasy Shout HUD (HUD = Heads-Up Display) enters your prepared text into open chat. It’s a great presentation tool for helping you and the audience track a presentation, especially if Voice is not working. The Shout chat range is about 100m, much further than regular chat.
We provide you with a SpeakEasy Shout HUD that you may copy and use in your projects.
Tutorial 2.1.1 - Instructions for using the SpeakEasy Shout HUD<span style='font-weight:normal;font-size:14px;font-style:italic'><--click to open/close</span>
ADD the Speakeasy Shout HUD from Inventory. It will attach to your center of your screen. You may Edit it and move it around on your screen. Make a copy!
Edit the HUD (Right-click / Edit), and give it a new name, such as ”My ISP Speakeasy HUD”
Note: Instructions are also available in the ‘SpeakEasy README’ notecard in the tool’s Contents
Open the HUD’s Contents tab, and open (double-click) the ‘speakme’ notecard. Replace the text with your presentation text.
Compose a presentation of at least 10 lines. Keep each sentence/paragraph brief; not more than around 25 words.
After each sentence/paragraph, press Enter to start a new line.
When you are finished, Save the speakme notecard and close Edit mode.
Test the Speakeasy. Tap it to display a line of text in Chat, and tap again for each subsequent line.
Restart the Speakeasy by either a) Edit / Contents / click ‘Reset Script’ or b) Detach and re-ADD the HUD.
Assignment 2.1.1 (1 point):
Compose a 2-minute Speakeasy presentation on a relevant topic.
Send the Speakeasy HUD to Tooyaa (Thuja Hynes) in SL.
The Preso-matic slide viewer is designed to display a set of slides during a presentation. The presenter determines when the pre-loaded slides will display, and can reverse the order using buttons.
The Auto-slide viewer will display a set of slides automatically, at a rate you determine.
We provide you with an Auto slide viewer and TWO Preso-matic viewers: 1) square aspect ratio (1:1) for square images and 2) 3×2 aspect ratio. You are urged to prepare images that have these aspect ratios.
Tutorial 2.1.2 - Instructions for preparing Preso-matic<span style='font-weight:normal;font-size:14px;font-style:italic'><--click to open/close</span>
For both viewers to work properly, you will need to prepare a minimum of 5 (five) textures)
Rez the Preso-matic Slide Viewer or Auto-slide Viewer (drag it from Inventory, to the ground)
Edit the viewer, open the Contents.
Drag your 5 prepared textures from Inventory into Contents
To determine the order, edit the textures in Contents and append numbers to the beginning of the texture names (for example: 1 My friend; 2 Our best time, etc…)
SUGGESTED: Add images to the slide show that develop your presentation. Do NOT load images with lots of text, or the script of your talk. Instead, illustrate your points with interesting images.
Assignment 2.1.2 (1 point):
Prepare a slide presentation.
A minimum of 5 slides illustrating a relevant course topic.
Send a copy of the completed tool to Tooyaa (Thuja Hynes) in SL. ACTIVITY 2.1.3:
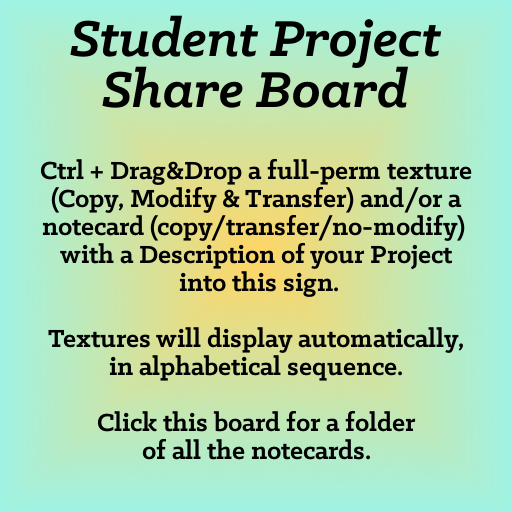
Drag&Drop Share Board Resources:
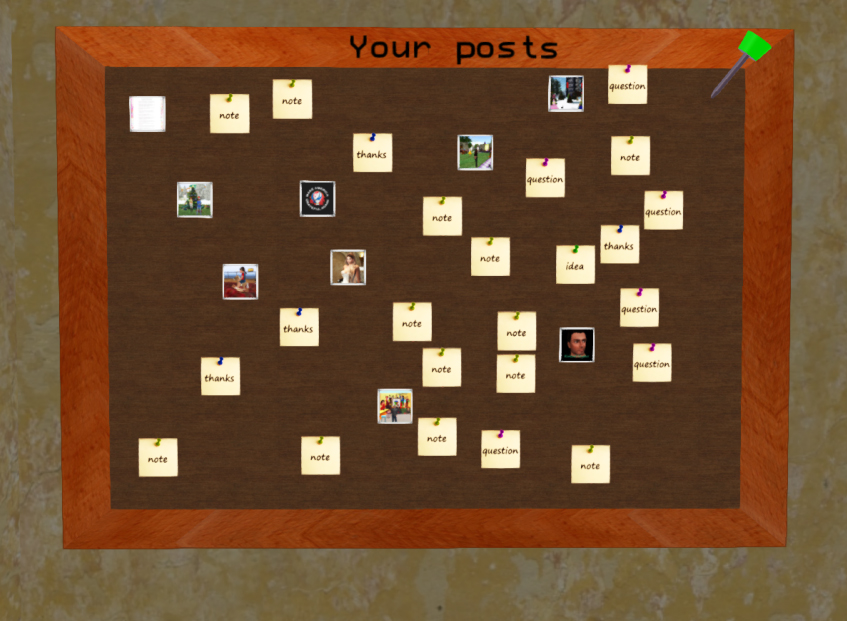
Share Board, instructions Image 2.1.3 – Share Board
The Share Board allows ANY SL Resident to add images and notecards to it, and to get the notecards from it in a folder. This is an INTERACTIVE tool designed to promote communication and teamwork.
Images in the Board’s Contents will display in alphanumeric order.
We provide you with a Share Board that you may copy and use in your projects.
Tutorial 2.1.3 - Instructions for using the Share Board<span style='font-weight:normal;font-size:14px;font-style:italic'><--click to open/close</span>
Rez the Share Board on the ground and move it where you wish.
Any SL Resident can add a texture by holding CTRL and dragging the texture from their Inventory, to the Board.
Any SL Resident can also add a notecard by holding CTRL and dragging the notecard from their Inventory to the board.
Only the Board’s owner can remove textures and notecards from the Board.
Team Assignment 2.1.3 (1 point):
Your ISP Project Team is required to have one Shareboard (See Lesson 3).
Add at least one texture to your Team’s Shareboard.
Add a notecard to the Team Shareboard.
Topics for textures and notecards should be relevant to this course.
The pin board is pretty easy for most of the messages. You click on the board, and a menu of choices appears. Click on what kind of message you want to pin to the board. You will get instructions in local chat as to how to do it. For most you only have 30 seconds to type your note into local chat.
There are two message types that need more explanation: Photos and Audio clips.
Tutorial 2.1.4 - How to add Photos and Audio to the Pinboard<span style='font-weight:normal;font-size:14px;font-style:italic'><--click to open/close</span>
BEFORE you click on the Pin Board to share a sound or photo, do the following steps:
Image 2.1.4.2 – Find InventoryFind the photo or sound you want to share in your inventory. Right click on the photo or sound you want to share. A menu will pop up and you will see “Copy Asset UUID” right under Rename. Click on that option. (If it is greyed out, that means you don’t have permission to copy or share it.) When you click on “Copy Asset UUID”, it will be copied to your clipboard and ready for use.
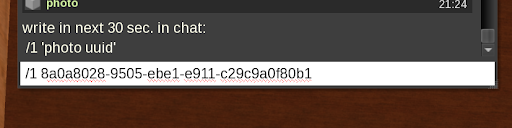
Image 2.1.4.3 – Pinboard MenuNOW you are ready to click on the Pin Board! Choose Photo if you want to share a picture, or Audio if you want to share a sound.
It will tell you to type /1 ‘sound UUID’ or /1 ‘photo UUID’ depending on your choice
In your Nearby Chat window type /1, hit space bar once to leave a space after the 1, and then click PASTE or Control -V, and it will paste in the UUID number you copied.
Hit Enter and the photo (snapshot or texture) will appear on the pin board. You can click to enlarge and see it better. Click again to put it back to normal.
If you chose audio (sound), when it appears on the board it looks like a CD disc. Click it and listen to the sound.
Assignment 2.1.4 (1 point):
Add two elements (objects) to Pinboard at International Student Center http://maps.secondlife.com/secondlife/Inspiration%20Island/158/143/702
Tutorial 2.2 - List of suggestions to get you started<span style='font-weight:normal;font-size:14px;font-style:italic'><--click to open/close</span>
Unless you plan to keep using Second Life, you won’t need a lot of detail about Inventory, BUT…
Most people who have been in Second Life have inventories that are out of control
Most of the videos I looked at in preparing to help you with this module were people describing their own inventories and “how they organized them”, but in almost all of them there were folders that were avoided because they were “a mess”, “horrible”, etc.
So the first, and most important tips I can give you (even for your short stint) so that you can easily find what you need for your class and your projects are:
If you don’t like something you try on or bought or were given, THROW IT OUT (that is, delete it).
If you accidentally make a duplicate, delete it. (But sometimes you SHOULD make a duplicate, like hair that you can resize. In that case you’ll want to keep the original, in case you mess it up.)
If you buy or even get an outfit or a piece of clothing or hair, etc. TRY THE DEMO first!!! If you don’t like it, or it doesn’t fit, DELETE THE DEMO
If you create an object, type in a name for it right away, or you’ll end up with a list of “objects” that you won’t be able to identify.
You can sort by alphabet or date. You can put the system folders on top and if you can
fit something under a subfolder within a system folder, that is good.
If you do like it and you buy it…or if you buy or get a bunch of things in a day, make time at the end of the day to PUT THEM IN FOLDERS. If you don’t think it fits under a folder that already exists, make a new one, or a new subfolder. If you make up a new category that suits you, I would make the main folder in capital letters, and the subfolders normal case.
Rarely used inventory can be packed into a box. A prim object can hold thousands of things in its Contents, but will count as only one Inventory object. Just remember to NAME the box something sensible, and to file it in a logical folder.
Empty your trash at the end of the day, BUT open and check it first. If you accidentally deleted something that you really want, then you can put it back (restore it). If you don’t check, and you empty your trash, that item or items will be GONE. FOR. GOOD.
Assignment 2.2.1 (1 point):
Organize ISP materials in Inventory. Make a Folder called ISP and at least one subfolder.
Take a screenshot showing the ISP folder andexpanded subfolders. Rename the picture “<Your account name> My ISP Inventory” (free if saved to Disk).
Type a search term or phrase in Keywords, then click the Search button. TIP: Change maturity level to General – Moderate.
Scroll through the list of matching items. It will show the price for each one. Make sure you have enough lindens in your account
Click on a listing you want to see (see notes below*). If you decide to purchase, click the yellow Buy Now button.
FOR CLOTHING OR HAIR: First see if there is a DEMO version, and purchase it first to make sure it will work with your avatar.
*FOR OBJECTS: Check for the words “land impact” or “prim count” (they mean the same thing), and try to find items with a low land impact (see Why Impact Matters in Second Life).
On the next page, click the blue Buy Now button. This should complete the purchase.
The item will be delivered to you in Second Life. Most items purchased will go into your “Received Items” folder. To find new items, open your inventory and open the “Recent Items” tab. Look in folders such as Objects, Notecards, and Landmarks, and open new folders.
Assignment 2.2.2 (2 points):
Modify your avatar, including skin, hair, and clothing.
Take selfie at WBH Photo Studio; Save to Disk (free)
ACTIVITY 2.3.1:
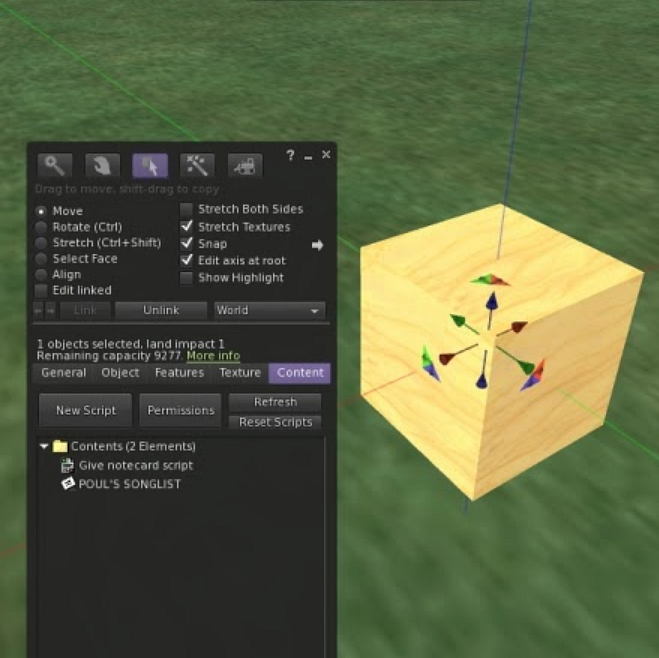
Create an Object Inventory Giver Resources:
Notecard Giver script Image 2.3.1 – Edit Object Contents
Notecard Giver Script Code:
//Give a notecard to anyone touching this object
default
{
    touch_start(integer total_number)
    {
        // get the UUID of the person touching this object
        key user = llDetectedKey(0);
        // Give them the first notecard found in the object's contents
        llGiveInventory(user, llGetInventoryName(INVENTORY_NOTECARD, 0) );
    }
}
Assignment 2.3.1.1 (1 point):
Find the Scripts folder in your inventory.
Right-click the folder and select New Script
Name the Script “Give Notecard script”
Copy the Notecard Giver Script code (above) and paste it into the new Script
Save the Script
Assignment 2.3.1.2 (1 point):
Create an object (prim)
Edit it, and name it “<-your avatar name-> My Notecard Giver”
Click Contents tab of the Edit Menu
Add a Notecard to the Contents (from Inventory, drag a saved Notecard to the Object Contents)
Add the Give Notecard script to the object Contents
Take the object back into Inventory (Right-click & Take)
Send the Notecard Giver to Tooyaa (Thuja Hynes) in SL
ACTIVITY 2.3.2:
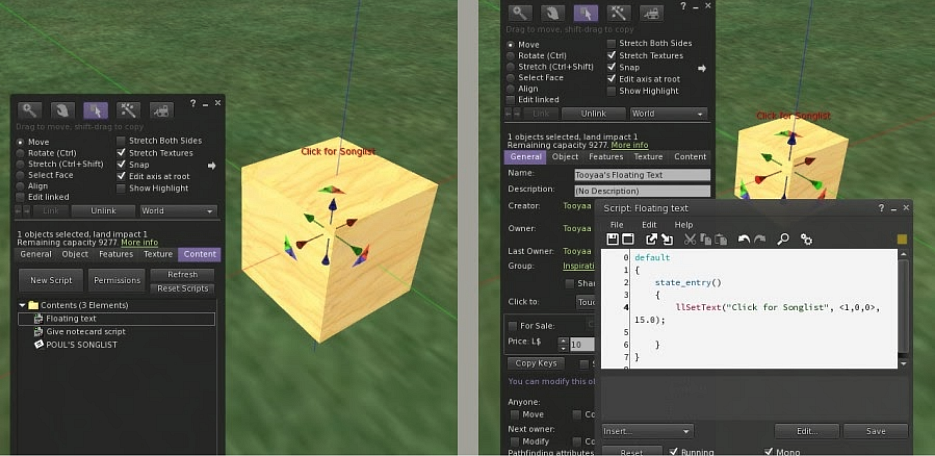
Create an object displaying Floating Text Resources:
Floating text script Image 2.3.2 – Edit Float Text Script
Float Text Script Code:
default
{
    state_entry()
    {
        llSetText("Touch for Notecard",<1,1,1>,5.0);
    }
}
Assignment 2.3.2.1:
Find the Scripts folder in your inventory.
Right-click the folder and select New Script
Name the Script “Float Text”
Copy the Float Text Script code (above) and paste it into the new Script
Save the Script
Assignment 2.3.2.2:
Rez the Notecard Giver object you made, and Edit it
Drag the Float Text script from Inventory to the Contents tab of the object
Rename the object “My Floating Text”
Take the object back into inventory
Send the object to Tooyaa (Thuja Hynes) in SL
*OPTIONAL* Note that you can change Float Text color using the SL vector code in the script. Each value can range from 0.0 to 1.0. <1.0,1.0,1.0> is a white color. Try a few different colors. Which is best? (see http://wiki.secondlife.com/wiki/Category:LSL_Color)
ACTIVITY 2.3.3:
Create an object displaying a Stationary Particle Resources:
The Stationary particle script. This script is more complex than this tutorial allows for. Please request a copy from Tooyaa (Thuja Hynes) in SL Assignment 2.3.3 (1 point):
Make particle “statue” of sustainability hero
On the web, Find an image of a hero of sustainability, such as Céline Cousteau
Save the image, and upload it to Second Life (This will cost L$10)
Create a Box with dimensions 0.5 x 0.5 x 1.0
Edit the Box and name it “<-your avatar name-> My Hero Particle”
Locate the Stationary Particle script in your Inventory, and the image you uploaded
Drag the script and image into the Contents tab of the box.
You should see a stationary particle of your sustainability hero!
This script makes the Object transparent, but displays the Particle texture. To locate the Object, use Area Search (World / Area Search) and type in “My Hero Particle”). Then Right Click & Delete from the Search Results.
Take the Object into your Inventory.
Send a copy to Tooyaa (Thuja Hynes) in SL
Report on your sustainability hero in your Course Blog
Lesson 2.4 - Environmental objectives
ACTIVITY 2.4.1:
Explore slurl, tp, LM with field trip


 Find the photo or sound you want to share in your inventory. Right click on the photo or sound you want to share. A menu will pop up and you will see “Copy Asset UUID” right under Rename. Click on that option. (If it is greyed out, that means you don’t have permission to copy or share it.) When you click on “Copy Asset UUID”, it will be copied to your clipboard and ready for use.
 NOW you are ready to click on the Pin Board! Choose Photo if you want to share a picture, or Audio if you want to share a sound.